
Hello there!
"oh Cool, Those Look Great"
Now that you know that, let's turn that Amazon purchase into some beautiful tropical plants.
Step One: Get Your Bearings.
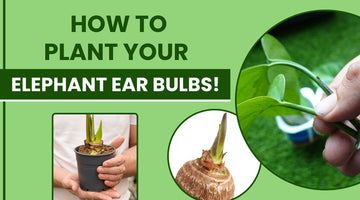
After opening your package, the first thing you will need to do is to identify the top and bottom of each of your Elephant Ear bulbs.
Finding the top
- The top of your bulbs will have a (sometimes very small) circular 'bump' in the center.
- That 'bump' can appear either brown or green.
- That 'bump' is where all new growth will be emerging from (roots and shoots).
- Sometimes bulbs will begin to sprout during the journey inside of their box. If that is the case, the top will be the side from which the little green sprout is emerging.
Finding the bottom
- The bottom will typically either:

Step Two: Good Things Come to Those Who Plan.
Elephant Ears Bulb can be planted in a pot OR directly in the ground, the best option for you will depend on where you live.
If you live in an area that experiences cold winters (below freezing) I would advise you to either:
- Plant your bulbs in a large pot that can be moved to a protected warmer area in winter months and then moved back outside after the last freeze of the year
- Start your bulbs in small growers pots so that they can start to sprout and grow someplace that they will not freeze and transplant them into the ground after your area experiences its final freeze of the year. Once winter comes again bury them in a layer of mulch to protect them as they spend the winter underground getting ready to sprout for your again in the Spring.
If you live in an area that does not experience freezing winters you can decide whether to plant them directly in the ground or in a large pot. Just know that the plants will grow to the size they are provided, so plants living in the ground will typically grow larger than plants living in pots (unless you choose a VERY large pot).
In a mild climate I would recommend† choosing a spot that gets full sun. If you are in a more extreme climate with very hot summers you may want to consider a spot with only partial sun to prevent them from needing multiple waterings a day to survive (but either way they will definitely need sun).
Step Three: Think Dirty Thoughts.
When selecting a potting soil, the most important aspect to consider is drainage.
Improper drainage can result in root-rot and deterioration of your bulb prior to sprouting. You'll want to avoid that. Perlite will help.

Perlite is a lightweight granular material that looks and feels like little white rocks, but is actually made from expanded volcanic glass, heated to 1000°C until it ‘pops’ to may times its original size (like popcorn). It is extremely porous, lightweight, sterile, easy to handle and vastly improves the drainage of any soil.
You can select a potting soil that contains perlite (most high quality pre-mixed potting soils do) or you can buy a small bag of perlite separately and add it to whichever soil you use.
..................

My personal favorite soil to use is Fox Farm: Ocean Forest, but most bagged potting soils that you can find at your local home improvement store will work just fine.
Step Four: Home is Here The Hole is.
- If planting your bulbs in a pot, fill the pot with high quality potting soil to the top, moisten the soil thoroughly and compact it. Dig a hole in the center of the soil with your hand that is at least 1/2" deeper than the bulb is tall.
- You will want to plant the bulbs deep enough to allow the highest part of the bulb to be 1/2″ down at minimum. Size your holes accordingly.
- If planting directly in the ground, dig a hole that is considerably larger than the bulb itself (both deeper and wider). Once finished, fill the hole up to the halfway point with your moistened potting soil.
Step Five: Moving Day
Place the bulb in the hole with the correct end pointing up (see step one). The entire bulb will need to be buried.

The ENTIRE BULB must be fully underground. This is because the roots of Colocasia Esculenta bulbs actually emerge from the top of the bulb, directly below the spot from where the sprout emerges.
Some online instructions I have come across tell you to plant the bulb partially in the ground but leave the top part poking out of the ground. That is terrible advise! Even if the roots started to grow for you like that, they would have no soil to grab onto and no soil to suck up water from when they emerge into the open air. You would have very frustrated bulbs, that would eventually become very dead bulbs. Don't do that!
Seriously. Don't.

So, to summarize....
- Make sure that the entire Elephant Ears Bulb is sitting at least 1/2" below the soil line.
- Fill in the rest of the hole with more of your moistened potting soil.
- Firmly compact the soil around the bulb. It is important to ensure that all parts of the bulb are in direct contact with soil (and the moisture in the soil).;
- Pat yourself on the back for doing a great job. Then maybe consider leaving us an Amazon review if you had an enjoyable experience!